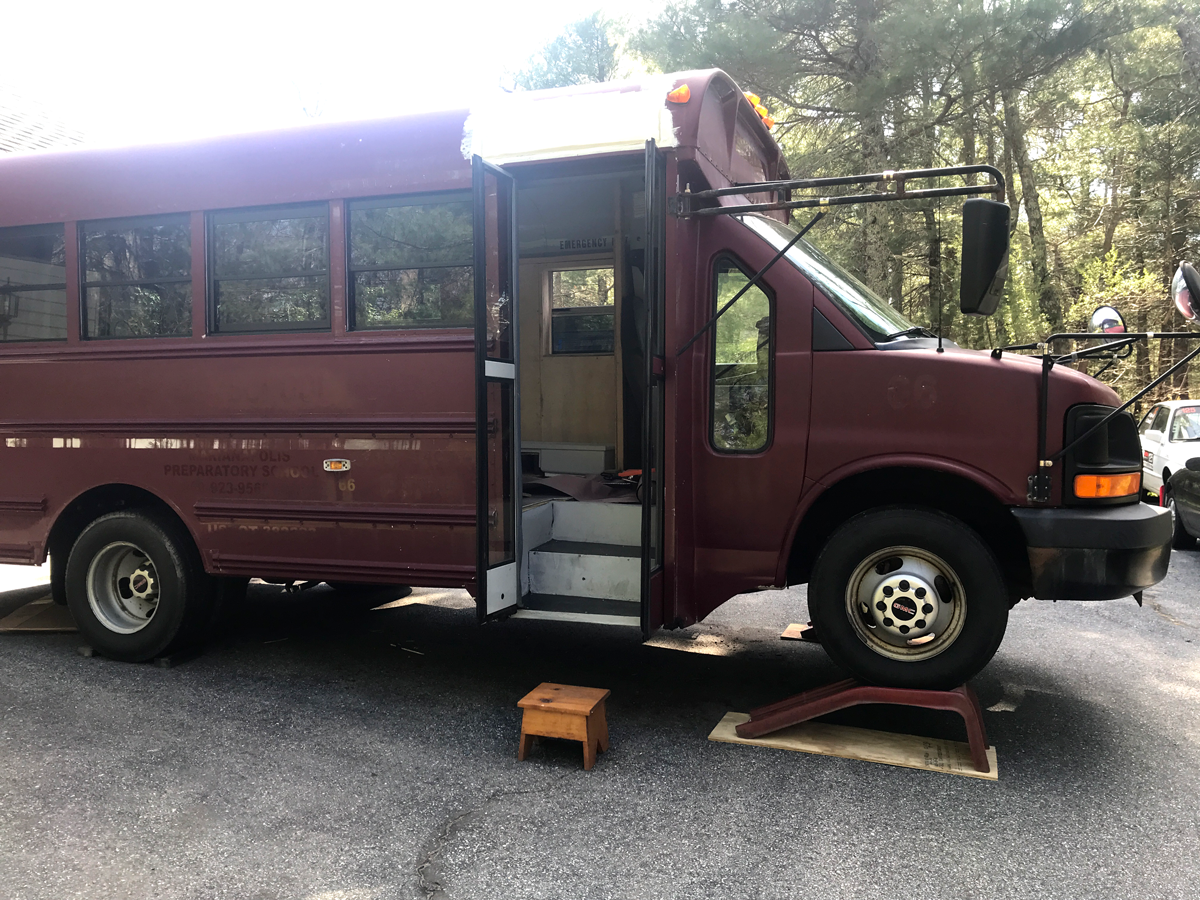
Sunny sat stable in launch mode, up on ramps, pointed at the sky for a long time. Some might say too long. So after we stabilized the cabinet and counter, it was time to give her a little run around town to blow out the cobwebs. The worst thing you can do to a vehicle, especially one of this vintage, is let it sit. And we let it sit.
We were in Gusto Mode to finish the interior, of course, so we skipped over some of the maintenance things that we really should have done even before we got started on the inside. One of those is literally just driving it around, which helps keep all the seals lubed up, the brakes from sticking, the oil flowing, the water pump circulating, and all that good stuff.
Even though we were well into the build, I hadn’t really gotten used to driving Sunny to get acclimated to her unique charms and capabilities. I mean, that first harrowing drive home wasn’t exactly the proper introduction. Now that the front brakes weren’t just grabbing one wheel in a death grip and smokin’ up the joint, it was a little easier in the driving arena.
Should buses ever be in Rally Mode?
I rolled Sunny backwards down the ramps, which is as terrifying as it sounds, and took off to splash some fresh go-juice in the tank. Unless it’s years old, new gas can rejuvenate older gas a skosh, so you don’t end up with a tank that smells like old varnish in a wood shop. So I added some refined dinosaur blood at the pump, grabbed a coffee (medium hot, milk only please), and set about a run around town to get things warmed up and circulating. She was running good, sounding good, and doing all the right things. Y’know, until I got into Rally Mode.
On a clean, clear stretch of 50 mph double yellow, I decided to help Sunny blow out the cobwebs with some spirited accelerations and decelerations. Normally, this does help burn some carbon build up off the valves and scrape the surface rust off the rotors, but this time, I was rewarded with a flashing Check Engine Light (CEL). Now, in my experience, orange CELs are just like a, ‘Hey, next time you’re under the hood, take a look at this, would ya’. Sunny’s CEL is orange. The blinking part raised my brow a little bit, as I’ve never quite seen something like that, despite the 700 cars I’ve owned in the last 300 years. So guess who ignored it for a while.
Yep, that was me. Naturally, my noggin presumed, oh, I didn’t blow out the cobwebs enough! Let’s blow out more cobwebs. So I take the bus and drive it all over the place, here, there, everywhere. Sometimes the light would blink, sometimes stay on constantly, then sometimes go out on its own entirely. And I’ve NEVER seen a CEL go out on its own. Blink. No blink. On. Off. On again. Blink again. What in the H was goin’ on here?
My internal computer was suggesting things from experiences past. The most typical CEL I’ve experienced is a loose gas cap, which triggers the emissions system into saying, ‘Hey, there’s a leak in the vacuum system somewhere, fix it and get back to us’, sorta thing. It wasn’t a loose cap. Bad gas? Maybe the fresh gas didn’t quite overcome the older gas? Nope, that wasn’t it either. Still carboned up? Maybe. Like any good armchair engineer, I mashed the gas repeatedly, apparently those cobwebs were more like Welcome to the Jungle webs. I did notice though, that whilst mashing, the CEL would definitely blink with enthusiasm. But when I gassed lightly, like egg-shelling the accelerator, it tended to stay solid, but not blink. So gas mashing and hypermiling had different effects. Science was happening.
I needed professional help
Out of brain-computer ideas, I relented, limped Sunny home, then attached my new nuclear-powered OBD-II scanner that I bought to diagnose and assist with another brake issue (see future post). The scanner, an Autel MaxiCheck Pro (paid link), found that Sunny had a few misfire codes. Misfire means that one or more cylinders aren’t getting either enough fuel, air, or spark to make a boom sound to make the pistons go up and down, which then pushes the rig forward using magic. In this case, we had eight cylinders, so it could be any one of them, or all eight, which was unlikely. As luck would have it, the Autel can actually tell you which one it is, which in my case, was No. 7. Before this event, a misfire wasn’t that bad in my book. I thought it just meant that you’d use a little more fuel than usual, because the unburnt fuel was just getting pushed out of the system. I mean, it wasn’t even backfiring, so it couldn’t have been that bad, right?
That was a little bit true. So, I drove it around a little more, Steph took it to a retreat in Rhode Island, then I drove it around again. Ran fine. Sounded great. Great power, 300 hp LS, mind you, the truck version of a Corvette engine. So for technical advice, I leaned on my friend Bill, the Mad Scientist. I texted him the situation, told him about the running fine thing, and all of that jazz, and thought maybe the CEL was just having a bad day.
“Nope,” Bill said. “If the light is on, and the scanner says you have a misfire, you have a misfire. And that’s bad.” Oh. Uh-oh. Apparently, it’s more than just bad mileage. That extra fuel can clog up the cats and do other bad engine things. Note: ‘Clogging up the cats’ does not mean overstuffing Ginger with Fancy Feast. It means that raw gas could fly into the catalytic converters, which are made of precious metals and space dust, and clog up the honeycomb-like structure. And that ain’t good, son.
It’s good to know another weirdo with a bus
Bill explained that his friend Marc has a very similar bus, also a 5-window GMC with a 6.0 gas engine. Marc discovered that GM doesn’t use a return line in its fuel systems, at least not with these rigs. The return line thing means that the engine calls for go-juice, the gas goes into the engine via a fuel line, into the fuel injector, which sprays fuel into the cylinder in a fine mist, like the lowest setting on your garden hose, the fuel blows up when the spark plug sparks, pushes the piston down, and whatever fuel doesn’t get burned on that initial run, flows back to the gas tank for another run around the system. GM truck engines, apparently, don’t have that return line, so the fuel pump is always pumping fuel into the injector and since it’s not returning, the fuel just sits at the gate waiting, then jams itself into the injector like the People Pushers on a Tokyo subway. Because of this, the pump can pick up more goo, rust, and other unsavory bits from the bottom of the gas tank and throw them directly into the injectors, which blocks fuel flow, and therefore no spark, bang, or go.
So guess who had some highly flammable cleaning to do? Yep, me. Guess who doesn’t like sudden explosions? Also me.
The first step in this process was taking a look at the fuel pump. Since the 33 gallon fuel tank is plastic, the only suspect for rust was the pump. Like most rigs, the fuel pump sits on top of the tank and has all its pumpy bits and wires hanging down into the explosive soup (now with more rusty chunks!). Also, yeah, sparky wires in a gas tank. Whose idea was that? Anywho, the thing looks like the Imperial Probe Droid from The Empire Strikes Back (if you know what that is, welcome to the treehouse, geek!). How does one get to the fuel pump to check its state of rustery? You guessed it, ya gotta drop the tank.
Yep. Easy, right? Nope. Sounds like it though. Believe it or not, there are only two, two-inch metal straps holding up all 33 gallons of blow-up broth. So what’s so hard about that? Well, first, I had just filled up before this all happened, so let’s say there was about 30 gallons of gas in there. Gas weighs six pounds per gallon, so there was about 180 pounds in the tank, which was my weight in high school. So basically I had to deal with an angsty, explosive teen clinging to the underside of the bus. Additionally, the bolts and one strap were particularly rusty and the fuel line fittings are proprietary GM, not like a regular hose clamp, so I had to buy a special tool (paid link). It wasn’t expensive, it just took some time to get it delivered. Perhaps the sketchiest part of that deal wasn’t dropping the tank itself, but emptying the tank into my racing jugs with a siphon. The more air and fumes you have, the more chances there are for blowing your face into next week.
Since the racing jugs only hold 6 gallons each, and another jug only 2.5 gallons, I ran around the yard and topped off the other cars, the lawn tractor, generator, weedwhackers, the neighbor’s cars, the fire trucks in town, etc. Once the tank finally came out, it was still sketchy business in that now I had a 33 gallon tank with only about a gallon of gas in it, so that leaves 32 gallons of fumes. Buh-BOOM! Unfortunately, all those fumes were venting directly into the air through the filler tube, which was just a-dangle and couldn’t accept a gas cap at the moment. While that’s not at all good for the environment, which I temporarily solved by shoving a rag in the end of the tube like a giant Molotov Cocktail, it also wasn’t good for me and the plus-sized fire hazard that I was pounding on with a hammer to get the fuel pump lock ring off. After a couple of YouTube classes on the ring, I also learned that I should be pounding with brass or some other non-sparky metal. Lesson learned there, thankfully with no damage to me or my face, which is still attached to my head.
Only two of these straps hold up 33 gallons of fuel. That little blue plastic thing is the fuel line taker-offer.
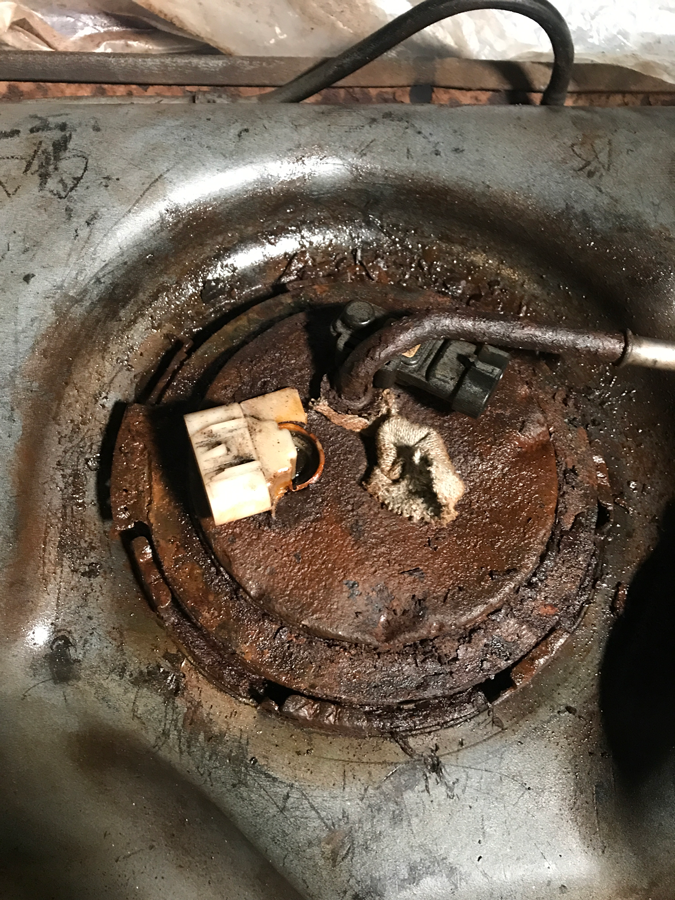
Hmmm, so this might be the cause of rust in the tank.
When in the surgical theatre operating on a fuel related procedure, it’s best to bang on things with tools that don’t spark. None of those tool are seen here.
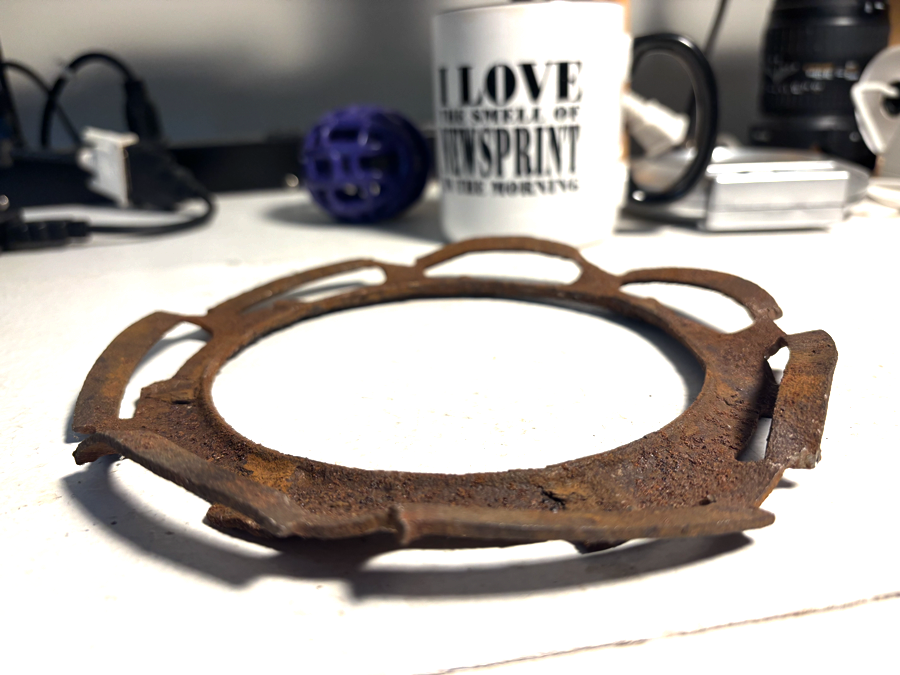
Lord of the Ring
The lock ring was another feat for the ages. Technically, you take a non-sparky pounding device, pick a tab on the ring, and tap it lefty-loosey and the ring pops off, almost like a big screw, or the cover of a pickle jar. When I started, there was so much rust on the ring, I couldn’t even determine if it had tabs, or that it was actually two pieces. After scraping and digging and digging and scraping, I did get the ring off finally, and now it shares a spot on the Slapdash Garage Museum wall as an Artifact of Achievement. Tickets go on sale soon.
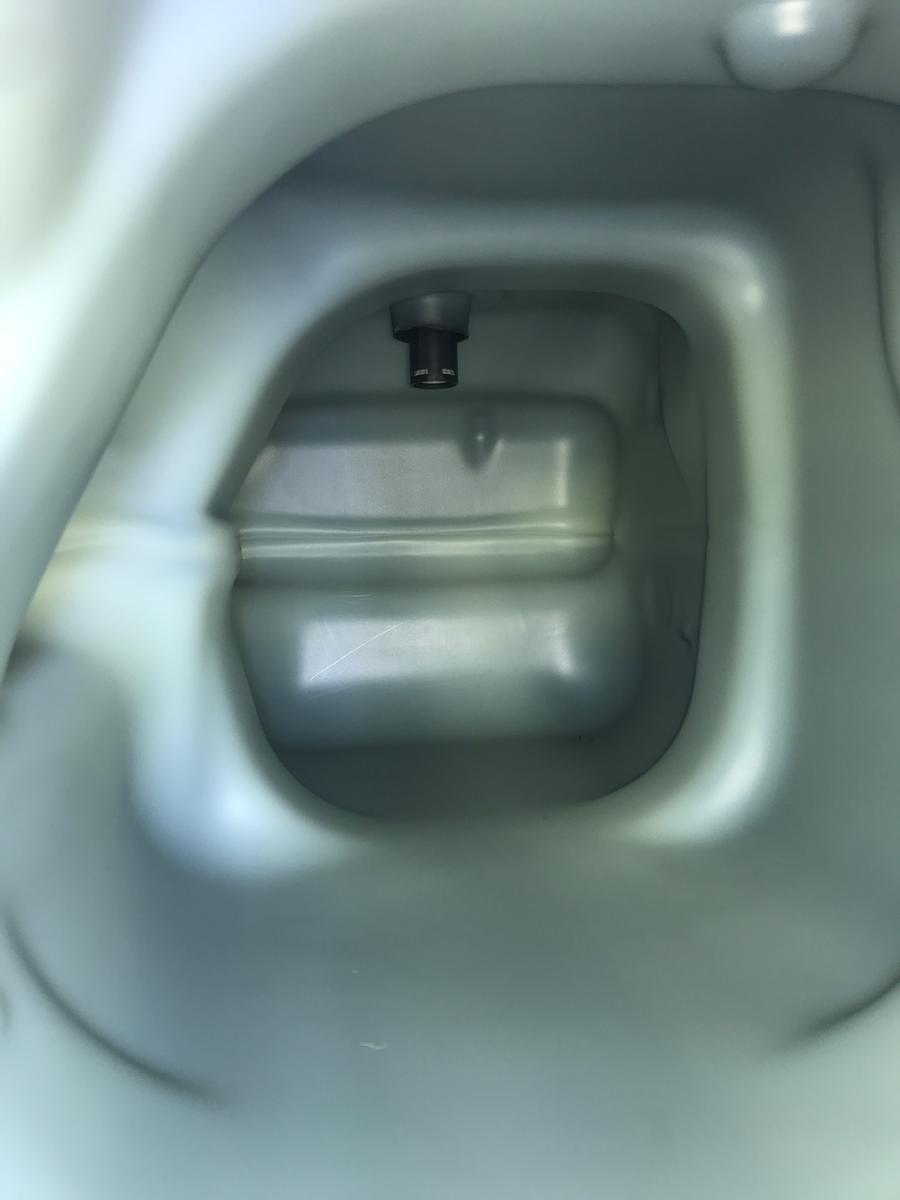
Alas, with the pump removed ever so carefully, I peered into the tank as if there was a honey badger waiting in there to pounce, because as we know from internet lore, honey badgers don’t give a sh!t, and they might just explode. I found some residual fuel, 32 gallons of fumes, and a pile of rusty flakes on the bottom of the tank. The latter was the culprit. Silty rust flakes (now in your cereal aisle) get sucked up the tube and squirted out into the injectors. I was able to siphon out a bit more fuel, avoiding the rust, then I just used a few rags to sop up the remaining fuel. Other than the pile of rust right under the pump, the tank itself was pretty clean. I’ll take it.
Museum Piece: This is basically supposed to be flat.
Mount up and ye shall ride
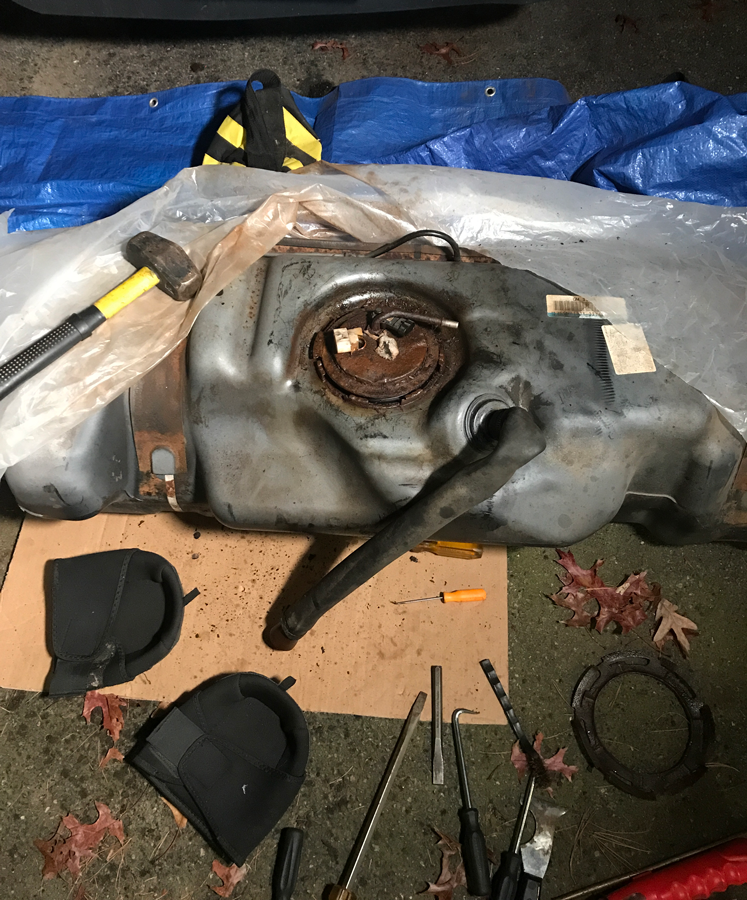
After installing the new Delphi pump (paid link), the re-mounting of the tank was, in theory, the opposite of removing it. The real tricky part, which is still an issue today, is the rubber filler neck, as seen in the surgical theatre above. The tank is very tightly packed once mounted, and this leaves very little room for the filler neck. The tube I took out was old, cracking, and twisted, like someone had just jammed it in there. I’ll fix that, says I, and ended up jamming it in and twisting it myself, as there is no humanly way to assemble it correctly unless you were on the production line at GMC Canada in 2005. While I was able to attach and clamp it in place, when fill-up time comes, the pump prematurely shuts off every few seconds, because the hose is kinked, and the pump thinks the tank is full. So fill-ups take a while, but I can rest easy knowing that my overpriced gasoline is sliding through a two-foot hose that cost us $80 and only took 11 days to get, as this was during the GM strike. Yep, there might be other typos in here, but that is not one of them. Eighty bucks. And do yourself a favor with the fuel pump, get a high quality one, as you don’t really want to do this job twice. Delphi was, and still is, GM’s original parts supplier and now they sell worldwide.
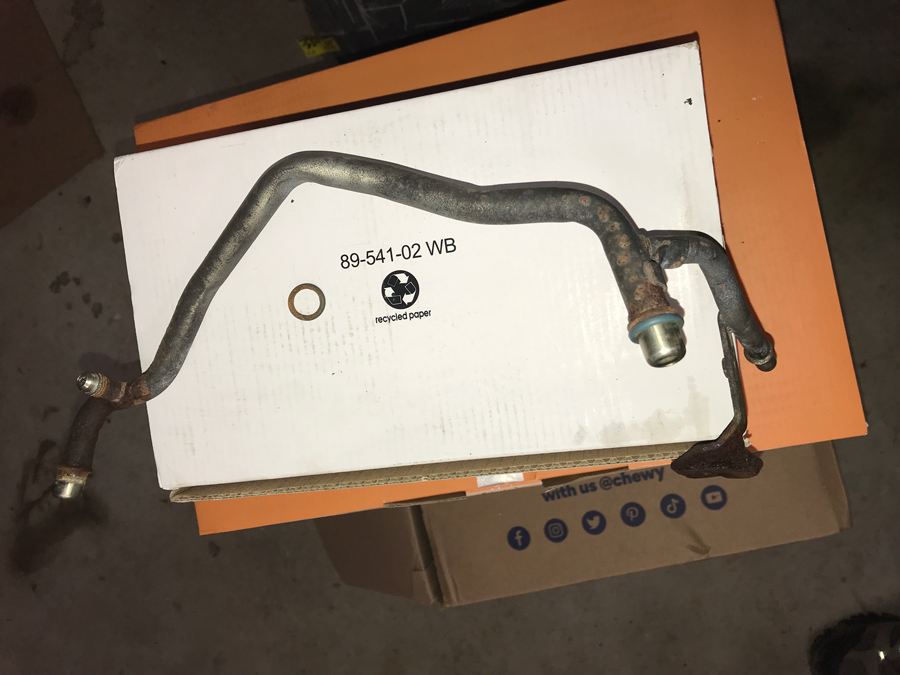
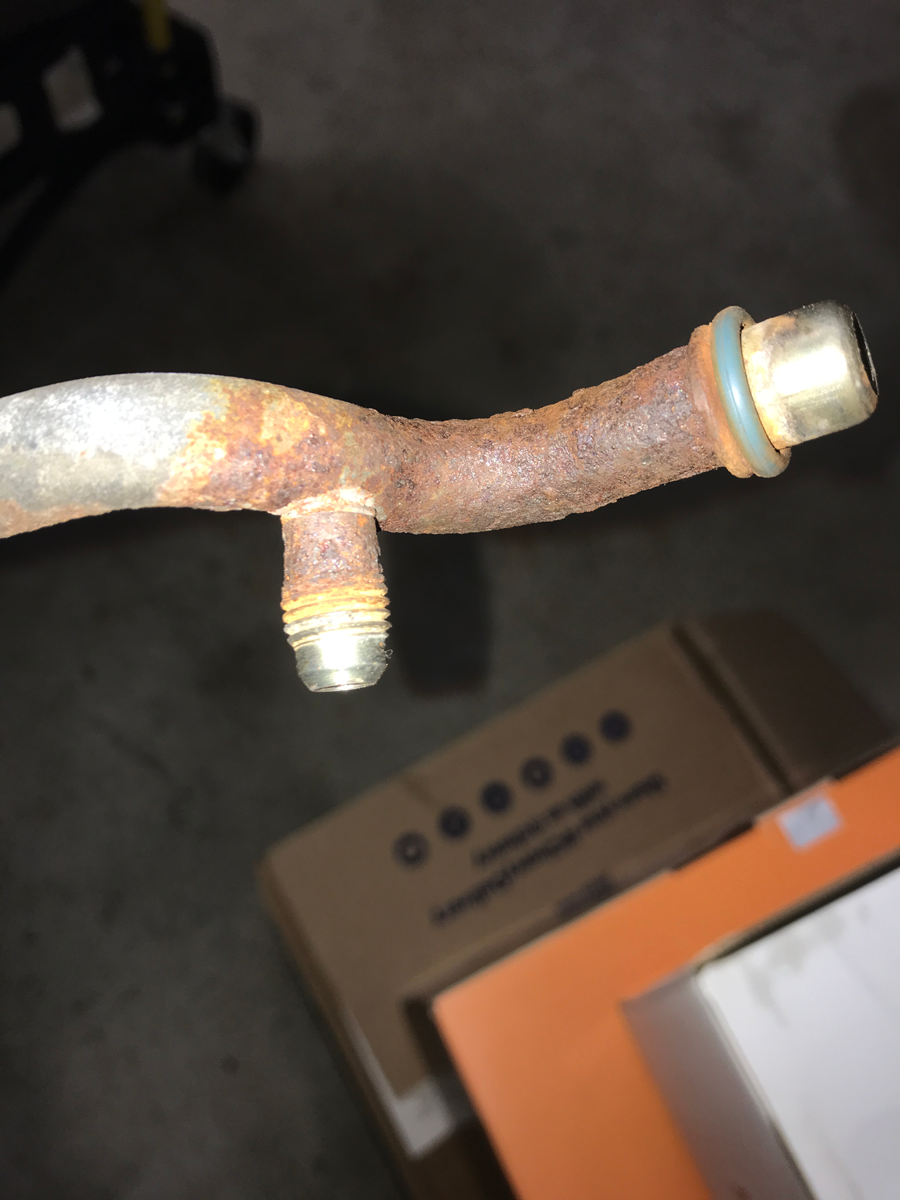
Speaking of the strike, added in with COVID-era supply chain issues, I needed two fuel lines, as they were a bit rusty as well. It was a ‘while you’re in there’ sort of thing. They were both roughly the same size, but had vastly different prices because one came from a local dealer and the other a dealer seemingly from pre-war Siberia. One was cheap, the other one, well let’s just say that if I didn’t buy it, I’d be retired right now. OK, OK, wasn’t that bad. At the last minute, I was able to pick it up locally, but I had to have a secret knock, a code, and an unregistered DNA sample, because they typically don’t let regular Joes buy things that way. The replacement process of these fancy tubes wasn’t that bad. It took a little snaking around and covering the ends with tape to prevent unknown debris falling in the tubes, but it was fairly easy to get them up to the injectors.
Removing the injectors wasn’t that bad either, but it did require some more snaking around, but this time, my body did the snaking instead. I had to remove the doghouse, which is probably the most pain in the A thing to do, harder than the injector cleaning. The doghouse is the engine cover inside the vehicle that gives access to most of the engine. It’s big, bulky, and awkward — just like me! In this case, I had to take the driver’s seat out too, for more wiggle room, but that’s just four bolts and a little plug. There is an under-seat fusebox that is semi delicate, that you might want to watch out for, in case you ever find yourself in this predicament.
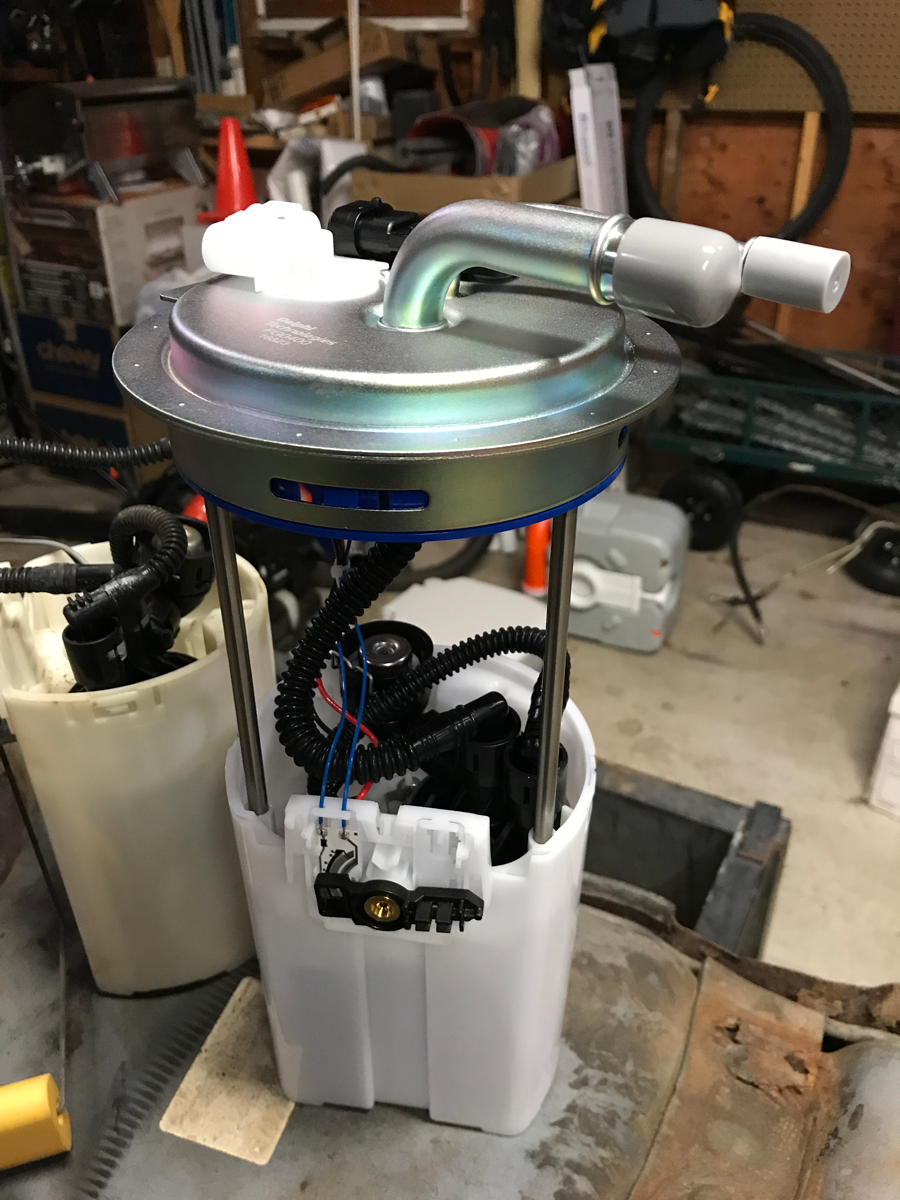
Ah, fresh parts! The new Delphi pump.
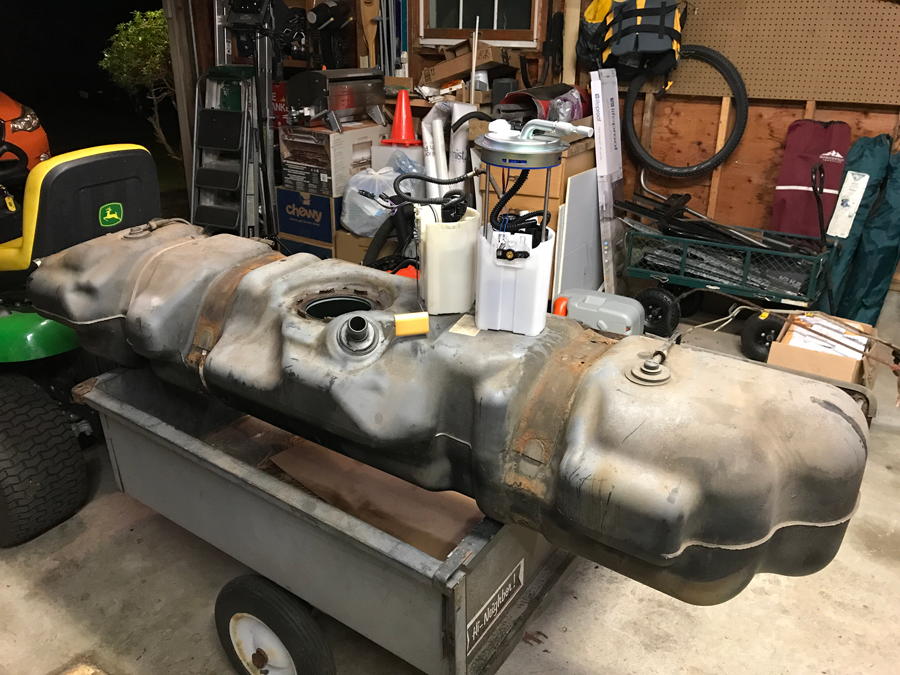
Here’s the old and new pumps sitting atop the freshly cleaned tank, using a lawn tractor trailer as a bench — because that’s what happens at Slapdash Garage.
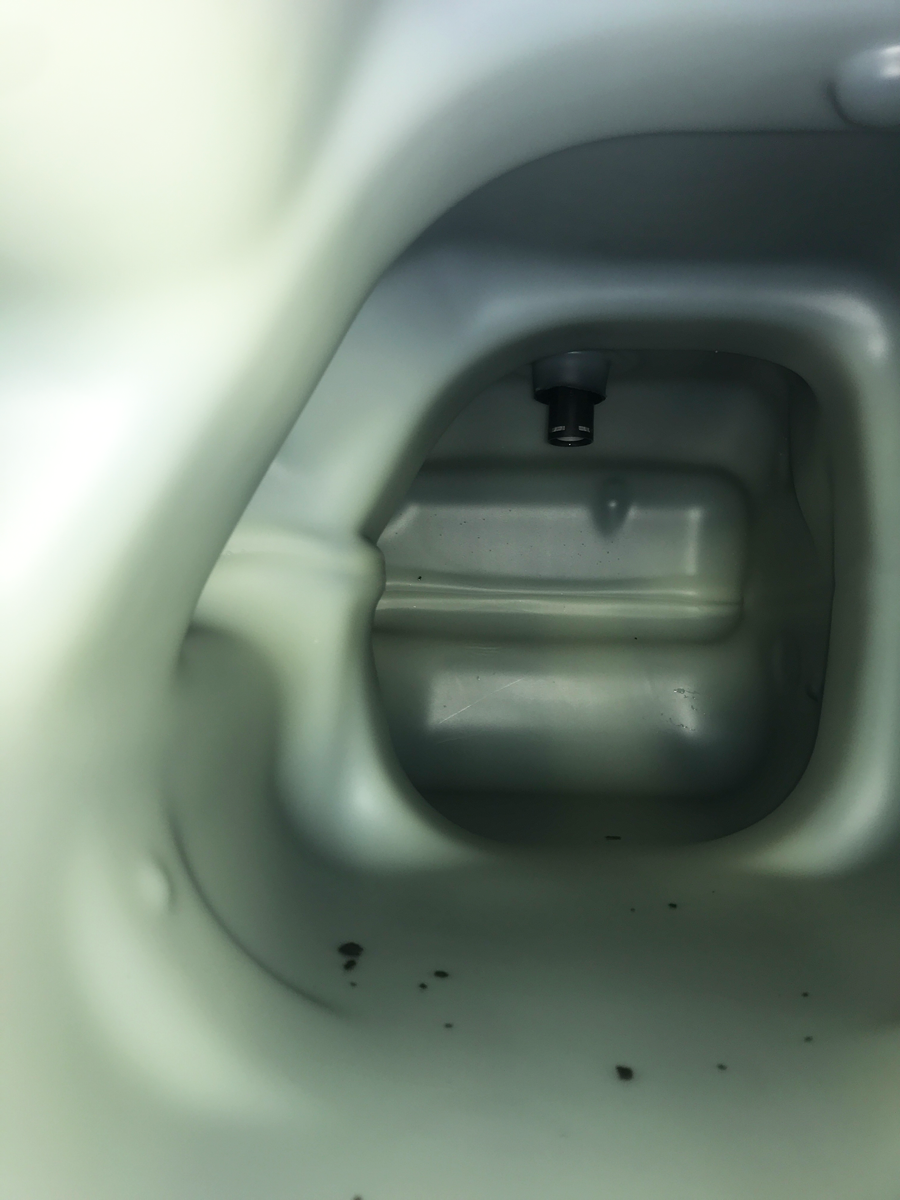
BEFORE: Here’s the inside of the tank featuring the rusty crusties.
AFTER: Here’s the inside all nice and spiffy.
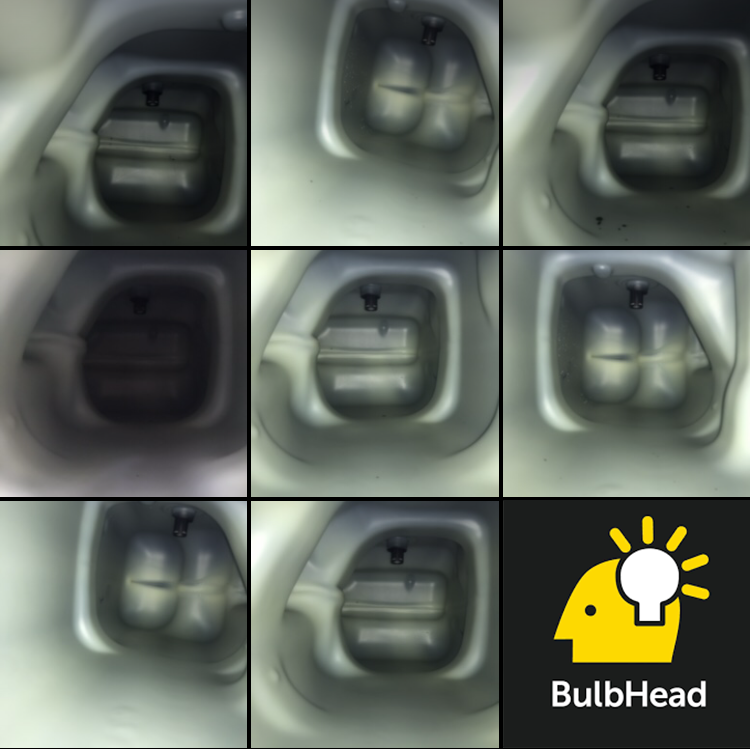
AFTER-AFTER: In preparation for this post, I took multiple shots of the inside of the tank only to realize that when listed in my phone library, it looks just like an X-ray series of BulbHead.
Mmmm, fresh O-rings!
Plucking the injectors out, which look similar to spark plugs, was a little easier than I thought. You do have to de-pressurize the system by pulling the pump fuse while it’s running, then disconnect the battery, pull the fuel rails, the things the injectors attach to, and undo some clips, small bolts, and a couple other things that might be in the way. Once I popped them out, it was easy to see that several of them were clogged with schmutz. The ends that received the fuel directly from the tank had a few rusty flakes and silt, almost. The spray ends weren’t that bad at all. After spraying out the receiving end with injector cleaner and air, you can actually hook the injector up to a 12V battery and spray the cleaner directly through the injector until the spray becomes super fine and even. Some were so bad, they needed a little prodding with a fine pick, then a heavier spray. Per YouTube University, once you’ve cleaned the injectors, you should also supply them with fresh o-rings (paid link), which were also somewhat elusive at the time. Originally, I wanted to just buy all brand-new injectors, but when I saw the price, I needed the vapors — not the fuel kind. So, a good cleaning was on the calendar. Once the o-rings are on, you can use a little light grease on them to help them slide back in their slots before clamping them down. And you know what? That all worked!
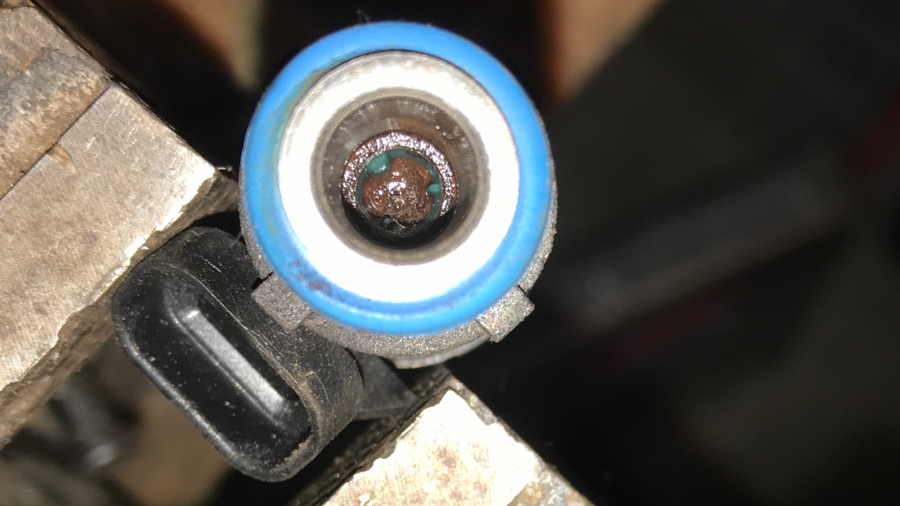
Clogged with schmutz, fuel injectors don’t work so well.
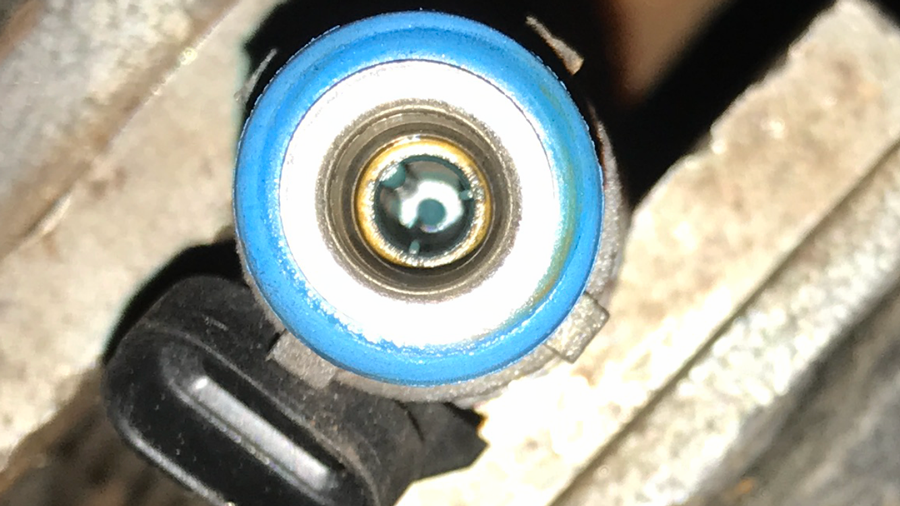
Ah, that’s better.
NLA is my new middle name
Upon reassembly, I noticed that the crossover tube, which connects the two fuel rails to each other for even misting, was a tad rusty as well. To the innernets I went to order a new one, but this time, this Sum-B was NLA, or No Longer Available from the factory. Of the trillions of Savana vans and Chevy Expresses out there, GM chose to get rid of that? Before I went and started to research custom made ones, I had a go with the wire wheel. Turns out a few swipes with the now-called Wonder Wheel did the trick. The rust came off and there were no weak points or pinholes that would spray go-sauce all over the hot exhaust manifold (see, Sudden Explosions). I painted it with some high-heat spray paint and tucked it back into position. I did manage to at least find o-rings (paid link) for this piece as well, so that was great. I’ve made gaskets before, but never o-rings. That just seems a little too fiddly.
Without this squiggly tube, the bus wouldn’t run. So thanks for discontinuing GM!
Luckily, I did find some o-rings on the ‘zon.
Close your eyes, turn the key, hope for the best
Before I turned the key, I had a moment of silence and did a noggin check. Did I clean everything, put everything back in its place, put the pump fuse back in, connect the lines, screw down the clamps, put some fuel back in the tank, put the gas cap back on, that sort of thing. Holding my breath, I turned the key to ACC and heard the new pump prime, a fabulous first step. Then one more turn and she started right up! Sunny was back in business. We went for another joy ride to test everything. No lights. No lag. No leaks!
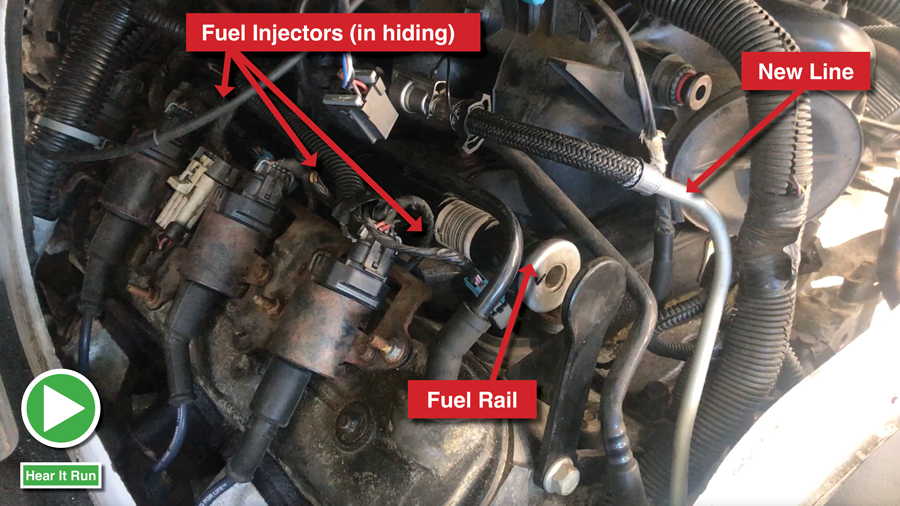
Here’s what it looks like in the doghouse (we’ve all been there, am I right?). The injectors are located straight down underneath the fuel rail. Click the pic for a nice, smooth running V8.
Now back to building a farmhouse in a bus…
-30-
Leave A Comment